Picture this: you’re making a delicious pesto, but you're out of fresh basil! A quick trip to the grocery store solves the problem, but what if you could extend the life of that store-bought basil and create an endless supply? The good news is, with a little know-how, you absolutely can! Growing Basil From Store-Bought: A Complete Guide So, can you really grow basil from store bought bunches? Absolutely! It's a fantastic way to save money, reduce waste, and enjoy fresh basil whenever you need it. However, the success of growing basil from store bought depends on a few key factors. This article will walk you through the entire process, from selecting the right basil to harvesting your homegrown leaves. We'll cover everything you need to know to successfully propagate basil from your grocery store haul. Selecting the Right Store-Bought Basil for Propagation Not all store-bought basil is created equal when it comes to propagation. To increase your ...
Want to multiply your basil plants without spending a dime? Forget buying seeds or starter plants! Growing basil from cuttings is a simple, rewarding process that allows you to clone your favorite basil varieties and enjoy a continuous supply of fresh herbs. It's like magic, but with a little water and some patience!
Why Propagate Basil From Cuttings?
Propagating basil from cuttings, also known asbasil cloning, is a fantastic way to expand your herb garden quickly and efficiently. There are several compelling reasons to choose this method over starting from seed.
Cost-Effectiveness and Cloning Your Favorites
First and foremost, it's incredibly cost-effective. Instead of constantly buying new plants, you can simply take cuttings from existing ones and create new plants for free. Imagine the savings, especially if you're an avid basil user! Plus, when you propagate basil from cuttings, you're essentially creating clones of the parent plant. This means your new plants will have the exact same characteristics, flavor, and aroma as the original. If you have a particular basil plant that you absolutely love, propagating it via cuttings ensures you can keep enjoying its unique qualities.
Speed and Efficiency Compared to Seeds
Compared to starting from seed, growing basil from cuttings is significantly faster. Seeds can take several weeks to germinate and grow into transplantable seedlings. Cuttings, on the other hand, can root in just a week or two, allowing you to harvest fresh basil much sooner. This speed is especially beneficial if you need basil quickly for a recipe or want to extend your growing season.
Salvaging Leggy or Overgrown Plants
Another great benefit is the ability to rejuvenate leggy or overgrown basil plants. Sometimes, basil plants can become stretched and spindly, especially if they're not getting enough light. By taking cuttings from these plants, you can effectively prune them back and encourage bushier growth. The cuttings themselves can then be rooted and grown into new, healthy plants.
Experimenting with Different Varieties
Using propagation, you can experiment with different basil varieties by sharing and trading cuttings with friends or neighbors. This is a great way to discover new flavors and broaden your culinary horizons. You could have Genovese basil, Thai basil, lemon basil, and purple basil all growing in your garden, simply by sharing cuttings!
Step-by-Step Guide:How to Root Basil Cuttings
The process of growing basil from cuttings is surprisingly simple and straightforward. Here's a detailed step-by-step guide to help you get started.
1. Selecting the Right Cutting
The key to success lies in choosing the right cutting. Look for healthy, vigorous stems that are about 4-6 inches long. These stems should have several sets of leaves and no signs of disease or pests. Avoid stems that are flowering or have buds, as these will direct energy towards flower production rather than root development. The best time to take cuttings is in the morning, when the plant is well-hydrated.
2. Preparing the Cutting
Once you've selected your cutting, use clean, sharp scissors or pruning shears to make a clean cut just below a leaf node (the point where leaves emerge from the stem). Remove the leaves from the bottom 1-2 inches of the stem, as these will be submerged in water and can rot if left on. Removing these leaves also encourages the plant to put energy into root growth. Optionally, you can dip the cut end of the stem in rooting hormone to encourage faster root development, though it's not strictly necessary for basil, as it roots readily without it.
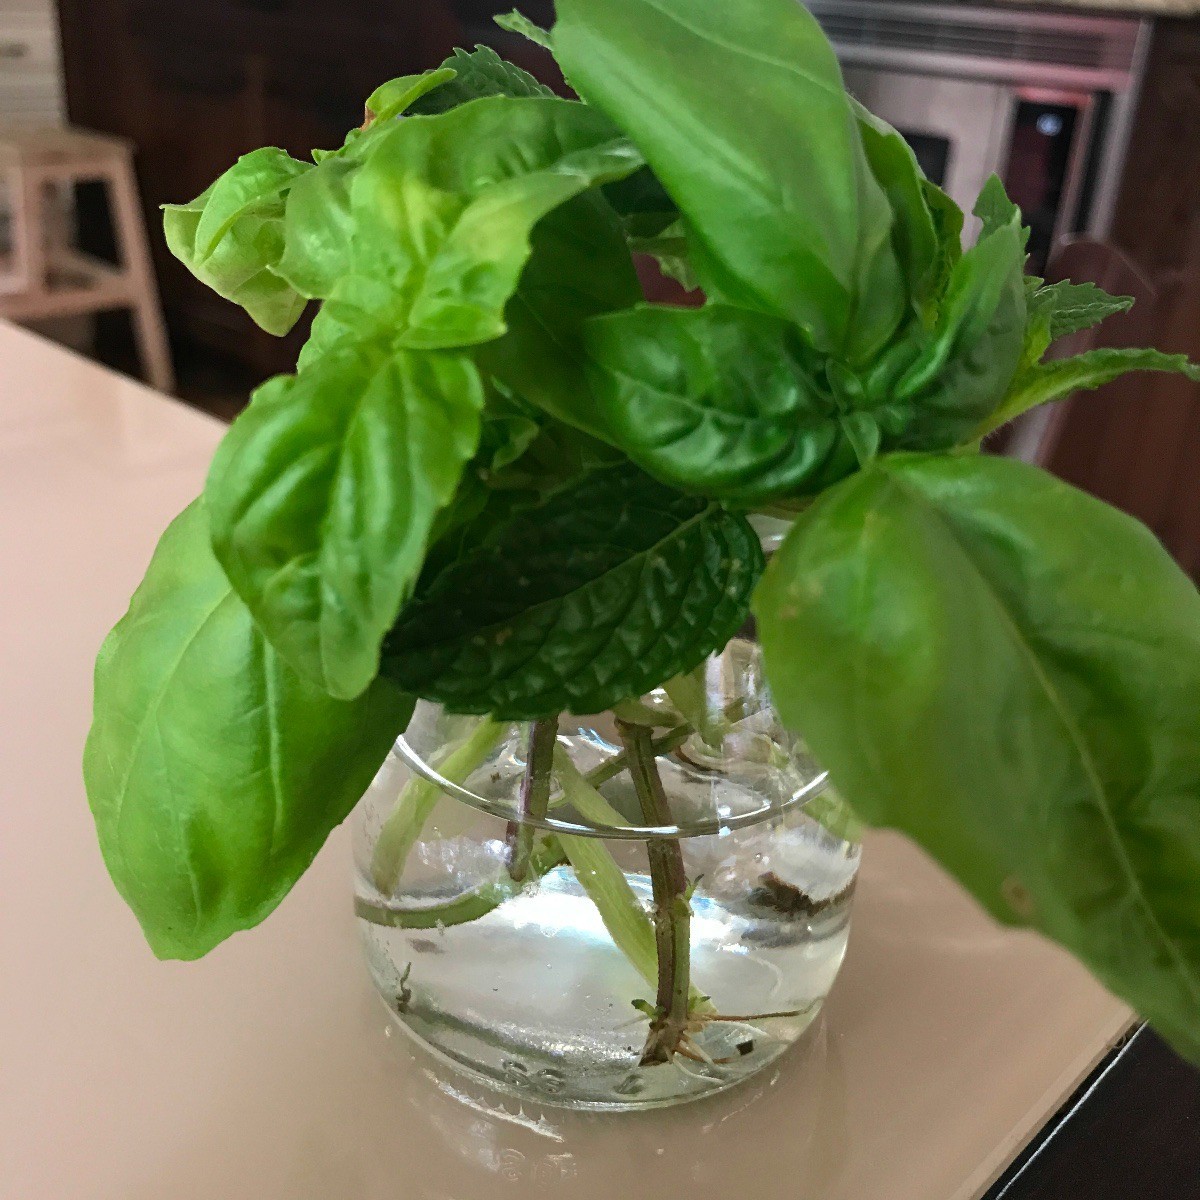
3. Rooting in Water or Soil
There are two main methods for rooting basil cuttings: in water or directly in soil. Both methods can be successful, so choose the one that you find easiest.
Rooting in Water: Place the cuttings in a clean glass or jar filled with fresh water. Make sure that only the bottom part of the stem is submerged, and that no leaves are touching the water. Place the jar in a bright, indirect sunlight location. Change the water every 1-2 days to prevent bacterial growth. Roots should start to appear within a week or two.
Rooting in Soil: Fill a small pot with a well-draining potting mix, such as a seed starting mix or a mix of perlite and vermiculite. Moisten the soil thoroughly. Make a small hole in the soil with a pencil or your finger, and gently insert the cutting into the hole. Gently press the soil around the stem to secure it. Cover the pot with a clear plastic bag or dome to create a humid environment. Place the pot in a bright, indirect sunlight location. Water regularly to keep the soil moist but not waterlogged.
4. Transplanting and Care
Once the cuttings have developed a healthy root system (about 1-2 inches long if rooting in water, or when you feel resistance when gently tugging on the stem if rooting in soil), they're ready to be transplanted into individual pots or directly into the garden. When transplanting, be careful not to damage the delicate roots. Plant the seedlings at the same depth they were growing in the rooting medium. Water them gently and keep the soil consistently moist for the first few days. Once the plants are established, you can gradually reduce watering to allow the soil to dry out slightly between waterings.
Optimal Growing Conditions
Basil thrives in warm, sunny conditions. Aim for at least 6-8 hours of sunlight per day. The ideal temperature range is between 65-85°F (18-29°C). Basil also prefers well-draining soil that is rich in organic matter. Fertilize regularly with a balanced fertilizer to promote healthy growth. Regular harvesting will also encourage bushier growth and prevent the plant from flowering prematurely.
Troubleshooting Common Problems
While growing basil from cuttings is generally easy, you may encounter some common problems along the way. Here's how to troubleshoot them.
Cutting Rotting Before Rooting
One of the most common problems is cutting rotting before it has a chance to root. This is usually caused by bacterial or fungal growth. To prevent rotting, make sure to use clean water and change it regularly if rooting in water. Avoid overcrowding the cuttings in a single container. If rooting in soil, ensure that the soil is well-draining and not waterlogged. You can also use a fungicide to prevent fungal growth, although this is usually not necessary.
Lack of Root Development
Sometimes, cuttings may fail to develop roots, even after several weeks. This can be caused by a variety of factors, including poor cutting selection, insufficient light, or overly dry conditions. Make sure to select healthy, vigorous cuttings from the parent plant. Provide adequate light, but avoid direct sunlight, which can scorch the leaves. Keep the rooting medium consistently moist, but not waterlogged. If you're rooting in water, try adding a drop or two of rooting hormone to the water. The importance of consistent moisture can't be understated, ensure you're using a reliable system. For instance, a high-qualitygarden hose, like a 75 FT Garden Hose with a 10-Function Nozzleavailable on Amazon at https://amzn.to/3Yv E0Bo, can help you easily and efficiently water your plants and cuttings.
Yellowing Leaves
Yellowing leaves can be a sign of several problems, including overwatering, underwatering, or nutrient deficiencies. Check the soil moisture levels and adjust watering accordingly. If the soil is constantly wet, allow it to dry out slightly before watering again. If the soil is bone dry, water thoroughly. You can also fertilize with a balanced fertilizer to provide essential nutrients.
Advanced Tips for Successful Basil Propagation
Want to take your basil propagation skills to the next level? Here are some advanced tips to help you achieve even greater success.
Using a Humidity Dome
Creating a humid environment around the cuttings can significantly increase your success rate. A humidity dome, such as a clear plastic bag or a propagation dome, helps to retain moisture and prevent the cuttings from drying out. Make sure to vent the dome regularly to prevent the buildup of mold or mildew. You can easily create a DIY humidity dome by placing a plastic bag over the pot and securing it with a rubber band.
Providing Bottom Heat
Bottom heat can also accelerate root development. A heat mat designed for seed starting can provide a gentle, consistent heat source that encourages root growth. Place the cuttings on the heat mat, making sure to monitor the temperature and prevent overheating.
Hardening Off the Seedlings
Before transplanting the rooted cuttings into the garden, it's important to harden them off. This process involves gradually exposing the seedlings to outdoor conditions, such as sunlight, wind, and temperature fluctuations. Start by placing the seedlings outdoors for a few hours each day, gradually increasing the exposure time over a period of one to two weeks. This will help the seedlings acclimate to their new environment and reduce the risk of transplant shock.
Conclusion
Growing basil from cuttings is a rewarding and cost-effective way to expand your herb garden. With a little patience and attention, you can easily create new basil plants from your existing ones, ensuring a continuous supply of fresh herbs for your culinary creations. So, grab your scissors, find a healthy basil plant, and start propagating! You'll be amazed at how easy it is to multiply your basil and enjoy the fresh, fragrant flavors of this beloved herb.