Picture this: you’re making a delicious pesto, but you're out of fresh basil! A quick trip to the grocery store solves the problem, but what if you could extend the life of that store-bought basil and create an endless supply? The good news is, with a little know-how, you absolutely can! Growing Basil From Store-Bought: A Complete Guide So, can you really grow basil from store bought bunches? Absolutely! It's a fantastic way to save money, reduce waste, and enjoy fresh basil whenever you need it. However, the success of growing basil from store bought depends on a few key factors. This article will walk you through the entire process, from selecting the right basil to harvesting your homegrown leaves. We'll cover everything you need to know to successfully propagate basil from your grocery store haul. Selecting the Right Store-Bought Basil for Propagation Not all store-bought basil is created equal when it comes to propagation. To increase your ...
Have you ever wished you could just snip a sprig of fresh basil whenever you needed it for your pasta sauce or caprese salad? Well, what if I told you that you could skip the soil altogether and grow basil directly in water? It sounds almost too good to be true, but with the right techniques, it’s a surprisingly easy and rewarding way to keep fresh basil on hand.
Growing Basil in Water: A Beginner's Guide
Growing basil in water is a simple and effective method, even for those without a green thumb. It's a fantastic way to propagate new basil plants from cuttings, extend the life of your store-bought basil, or simply enjoy the beauty of a plant thriving in a clear vase. Let's explore the ins and outs of this easy gardening method.
Why Grow Basil in Water?
There are numerous benefits togrowing basil in water compared to traditional soil gardening. First and foremost, it's incredibly convenient. You don't need to worry about soil quality, pests that live in the soil, or overwatering and underwatering. It's a low-maintenance solution that fits perfectly into busy lifestyles. Let's dive a bit deeper into the reasons why people choose this method:
- Space-saving: Perfect for apartments, balconies, or small kitchens.
- Low-maintenance: Minimal watering and no need for fertilizers.
- Easy Propagation: Easily create new basil plants from cuttings.
- Extends Freshness: Keeps cut basil fresh for longer than storing it in the fridge.
- Visually Appealing: Adds a touch of greenery and elegance to your indoor space.
- Cost-effective: Reduces the need to buy basil from the store frequently.
- Simple to Monitor: You can easily see the water level and root development.
How to Propagate Basil in Water: A Step-by-Step Guide
The most common method ofgrowing basil in water involves propagating it from cuttings. Here’s a detailed guide on how to do it successfully:
Step 1: Selecting the Right Cuttings
Choose healthy basil stems that are about 4-6 inches long. Look for stems that are green and vibrant, free from any signs of disease or pests. Ideally, select stems that have not yet flowered, as flowering can divert energy away from root development. Using sharp, clean scissors or pruning shears, make a clean cut just below a node (the point where leaves grow from the stem). The cleaner the cut, the better the chance of success.
Step 2: Preparing the Cuttings
Once you have your cuttings, gently remove the leaves from the lower 1-2 inches of the stem. This is crucial because any leaves submerged in water will rot and contaminate the water, potentially hindering root growth. Removing these lower leaves will allow the plant to focus its energy on root production. It's also important to minimize damage to the stem during this process to prevent infection.
Step 3: Choosing the Right Container
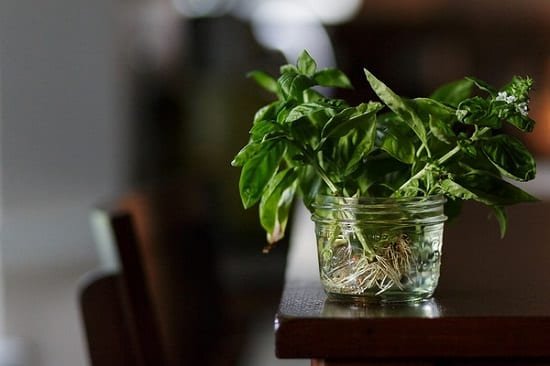
Select a clean glass or jar with a narrow opening. A narrow opening will help support the basil stems and prevent them from tipping over. It also minimizes the surface area exposed to air, which can reduce evaporation and the risk of algae growth. Clear glass is ideal because it allows you to monitor root development. Ensure the container is thoroughly cleaned to remove any residue that might inhibit growth.
Step 4: Providing the Right Water
Fill the container with fresh, clean water. Filtered or distilled water is preferred, as tap water can contain chemicals that may harm the basil cuttings. Make sure the water level is high enough to cover the nodes from which you removed the leaves, as this is where the roots will emerge. Change the water every 1-2 days to prevent bacterial growth and keep the water fresh and oxygenated. This is a crucial step ingrowing basil cuttings in water and contributes significantly to successful root development.
Step 5: Providing Optimal Conditions
Place the container in a location that receives bright, indirect sunlight. Direct sunlight can scorch the leaves and overheat the water, while insufficient light can inhibit root growth. A windowsill that receives morning sun or a spot near a sunny window is usually ideal. The temperature should be consistently warm, ideally between 65-75°F (18-24°C). Avoid placing the cuttings near drafts or heating vents, as these can cause the cuttings to dry out. Consistency in these conditions is key togrowing basil in a jar.
Step 6:Monitoring Root Development
Be patient! Root development typically takes about 1-2 weeks. You should start to see small white roots emerging from the nodes. Once the roots are about 2 inches long, the basil cutting is ready to be transplanted into soil, if desired. If you prefer to continuegrowing basil plants in water, simply continue to change the water regularly and provide the appropriate conditions.
If you're looking to maintain your garden, or thinking of starting one, it might be time to consider purchasing the right equipment. For efficient watering, a quality garden hose is essential. Check out this fantastic Garden Hose 75 FT with 10-Function Nozzle, Leak-proof Metal Connector Water Hose. You can find this incredible tool for your yard, the 75 foot Garden Watering Hose with it's incredible variety of functions, here:https://amzn.to/3Yv E0Bo
Maintaining Basil Growing in Water
Once your basil cuttings have developed roots, maintaining them is quite straightforward. Here are some essential tips for ensuring your water-grown basil thrives:
- Water Changes: Continue to change the water every 1-2 days to keep it clean and prevent bacterial growth. This is crucial for the health of your basil.
- Nutrient Supply: Basil growing in water won’t receive nutrients from soil, so consider adding a diluted liquid fertilizer to the water every 2-4 weeks. Use a balanced fertilizer specifically formulated for hydroponics or leafy greens, and follow the instructions on the label carefully. Over-fertilizing can be just as harmful as under-fertilizing, so err on the side of caution.
- Light Exposure: Maintain the same bright, indirect light conditions. Rotate the container periodically to ensure all sides of the plant receive adequate light, promoting even growth.
- Pruning: Regularly prune your basil plant to encourage bushier growth and prevent it from becoming leggy. Pinch off the top sets of leaves to stimulate the growth of side shoots. You can use the pruned leaves for cooking, so it's a win-win!
- Algae Prevention: Algae growth can be a problem in water-grown plants. To prevent this, clean the container regularly and consider using an opaque container to block light, which inhibits algae growth. If algae does appear, thoroughly clean the container and change the water immediately.
Troubleshooting Common Problems
Even with the best care, you might encounter some challenges whengrowing basil in water. Here are some common issues and their solutions:
- Yellowing Leaves: This can be caused by several factors, including insufficient light, nutrient deficiency, or poor water quality. Ensure your basil is receiving enough bright, indirect light, and consider adding diluted liquid fertilizer to the water. Also, make sure you are changing the water regularly.
- Root Rot: Root rot is caused by bacteria or fungi in the water. It's often characterized by brown, slimy roots. To prevent root rot, change the water regularly and ensure the container is clean. If root rot does occur, remove the affected roots with clean scissors and transplant the basil to fresh water in a clean container.
- Slow Growth: Slow growth can be caused by insufficient light, low temperatures, or lack of nutrients. Ensure your basil is receiving enough light and warmth, and consider adding diluted liquid fertilizer to the water.
- Pests: While less common than in soil-grown basil, pests can still be a problem. Inspect your basil regularly for any signs of pests, such as aphids or spider mites. If you find any pests, gently wash the plant with water or use an insecticidal soap specifically formulated for edible plants.
From Water to Soil: Transplanting Your Basil
While you can successfully grow basil in water indefinitely, you may eventually want to transplant it to soil. Here’s how to do it:
Choosing the Right Pot and Soil
Select a pot that is appropriately sized for the basil plant, typically a 6-8 inch pot. Ensure the pot has drainage holes to prevent waterlogging. Use a high-quality potting mix that is well-draining and rich in organic matter. A mix of equal parts potting soil, perlite, and compost is ideal.
Transplanting Process
Gently remove the basil plant from the water, being careful not to damage the roots. Dig a hole in the potting mix that is large enough to accommodate the roots. Place the basil plant in the hole and gently backfill with potting mix, making sure to cover the roots completely. Water thoroughly after transplanting. During transplanting, you might find that awater hose for gardening is essential for the initial saturation of the soil.
Post-Transplant Care
Keep the newly transplanted basil plant in a location that receives bright, indirect light. Water regularly, keeping the soil moist but not waterlogged. Fertilize every 2-4 weeks with a balanced liquid fertilizer. Monitor the plant for any signs of stress, such as wilting or yellowing leaves. If stress occurs, adjust the watering and light conditions as needed.
Conclusion
Growing basil in wateris a simple, rewarding, and sustainable way to enjoy fresh herbs year-round. Whether you’re propagating new plants, extending the life of store-bought basil, or simply adding a touch of greenery to your space, this method offers numerous benefits for both beginners and experienced gardeners alike. With a little care and attention, you can have a thriving basil plant growing in water in no time, ready to provide you with fresh, flavorful leaves whenever you need them.