Picture this: you’re making a delicious pesto, but you're out of fresh basil! A quick trip to the grocery store solves the problem, but what if you could extend the life of that store-bought basil and create an endless supply? The good news is, with a little know-how, you absolutely can! Growing Basil From Store-Bought: A Complete Guide So, can you really grow basil from store bought bunches? Absolutely! It's a fantastic way to save money, reduce waste, and enjoy fresh basil whenever you need it. However, the success of growing basil from store bought depends on a few key factors. This article will walk you through the entire process, from selecting the right basil to harvesting your homegrown leaves. We'll cover everything you need to know to successfully propagate basil from your grocery store haul. Selecting the Right Store-Bought Basil for Propagation Not all store-bought basil is created equal when it comes to propagation. To increase your ...
Thai basil, with its distinctive anise-like aroma and vibrant purple stems, adds a unique flair to both culinary creations and garden landscapes. But what if I told you that propagating this fragrant herb is easier than you might think? Forget starting from seeds – you can quickly expand your Thai basil patch with a simple method: cuttings. Let's dive into how you can grow your own Thai basil from cuttings and enjoy a continuous supply of this flavorful herb.
Propagating Thai Basil From Cuttings: A Gardener's Guide
Growing Thai basil from cuttings is a rewarding and cost-effective method of propagation. It's much faster than starting from seed, allowing you to quickly expand your basil collection. This method, also known as cloning, leverages the basil plant's natural ability to produce roots from its stems. This means more Thai basil for your favorite recipes and a beautiful, fragrant garden to enjoy. The steps are simple enough for beginner gardeners, but even experienced green thumbs can appreciate the efficiency of this approach.
Why Choose Cuttings Over Seeds for Thai Basil?
While starting from seeds is a traditional method, propagating Thai basil from cuttings offers several advantages:
- Speed: Cuttings root much faster than seeds germinate and grow into mature plants. You can have a transplant-ready Thai basil plant in just a couple of weeks.
- Cloning: Cuttings produce plants that are genetically identical to the parent plant. This is particularly useful if you have a Thai basil plant with exceptional flavor or disease resistance that you want to replicate.
- Cost-Effective: Instead of buying new seeds every year, you can simply take cuttings from your existing Thai basil plant.
- Space Saving: Cuttings allow for greater control over the number of plants you wish to cultivate, reducing the need for extensive seed starting spaces.
Consider this, if you are looking to expand your garden space in general, make sure you have a reliable watering tool to help you. With the right watering tool, you can easily manage your garden and enjoy the beautiful blooms and fresh herbs. I have been using aGarden Hose 75 FT with 10-Function Nozzle, it's leak-proof and kink-free. I bought it at Amazon:https://amzn.to/3Yv E0Bo. So, if you're seeking a user-friendly and durable garden hose to simplify watering chores, this one might just be your best bet.
Selecting the Right Cuttings for Thai Basil Propagation
Success in growing Thai basil from cuttings hinges on selecting healthy and vigorous stems. Here's what to look for:
Identifying Ideal Cuttings
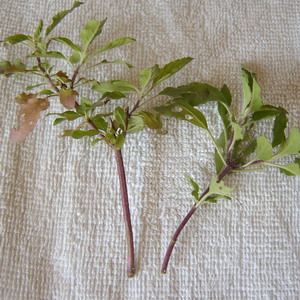
Choose stems that are:
- Healthy: Look for stems that are free from pests, diseases, and any signs of stress.
- Vigorous: Select stems that are actively growing and have plenty of healthy leaves.
- Non-flowering: Avoid stems that have already started to flower, as they may not root as readily.
- Length: Aim for cuttings that are 4-6 inches long.
Taking the Cuttings
Use a clean, sharp knife or pruning shears to take the cuttings. Make the cut just below a node (the point where leaves emerge from the stem). Removing the lower leaves from the cutting is essential to prevent them from rotting in the water and to encourage root development. Leave only the top few leaves intact.
A study by the University of California, Davis, found that the success rate of rooting cuttings is significantly higher when taken from healthy, non-flowering stems. The researchers emphasized the importance of using sharp, clean tools to minimize damage to the stem tissue and reduce the risk of infection.
Rooting Thai Basil Cuttings: Water vs. Soil
There are two primary methods for rooting Thai basil cuttings: water propagation and direct soil planting. Let's explore each option:
Water Propagation
This is a popular and easy method for beginners. Simply place the cuttings in a glass or jar filled with water, ensuring that the leaves are above the water line. Place the jar in a bright, indirect light location. Change the water every 1-2 days to keep it fresh and prevent bacterial growth. Within a week or two, you should see roots begin to emerge from the nodes. Once the roots are about an inch long, the cuttings are ready to be transplanted into soil.
Benefits of Water Propagation:
- Easy to monitor root development.
- Simple and requires minimal materials.
Drawbacks of Water Propagation:
- Roots grown in water may be more fragile and require careful handling during transplanting.
- Risk of bacterial or fungal growth in the water if it's not changed regularly.
Direct Soil Planting
This method involves planting the cuttings directly into a well-draining potting mix. Dip the cut end of the cutting in rooting hormone to promote root development. Make a hole in the soil and gently insert the cutting, ensuring that the lower nodes are buried. Water thoroughly and cover the pot with a plastic bag or humidity dome to create a humid environment. Place the pot in a bright, indirect light location and keep the soil consistently moist. Rooting should occur within 2-4 weeks.
Benefits of Direct Soil Planting:
- Reduces transplant shock, as the roots develop directly in the soil.
- May result in stronger, more robust root systems.
Drawbacks of Direct Soil Planting:
- More difficult to monitor root development.
- Requires a more controlled environment with consistent moisture and humidity.
Transplanting and Caring for Your New Thai Basil Plants
Once your Thai basil cuttings have developed a healthy root system, it's time to transplant them into individual pots or directly into your garden. Here's how:
Transplanting
When transplanting, choose a well-draining potting mix and a pot that is large enough to accommodate the growing root system. Gently remove the cutting from the water or soil and plant it in the new pot. Water thoroughly and provide support if needed. If planting in the garden, choose a sunny location with well-drained soil.
Caring for Your New Plants
Thai basil thrives in warm temperatures and plenty of sunlight. Water regularly, allowing the soil to dry slightly between waterings. Fertilize every few weeks with a balanced fertilizer to promote healthy growth. Pinch off the top growth regularly to encourage branching and prevent flowering. Flowering will diminish the flavor of the leaves, so it's best to keep your Thai basil plants vegetative.
Essential Care Tips:
- Sunlight: Thai basil needs at least 6 hours of sunlight per day.
- Watering: Water deeply when the top inch of soil feels dry. Avoid overwatering, which can lead to root rot.
- Fertilizing: Feed your Thai basil plants every 2-3 weeks with a balanced fertilizer.
- Pinching: Pinch off the top growth regularly to encourage branching and prevent flowering.
Dealing with Common Problems
Thai basil is generally a relatively pest-resistant plant, but it can be susceptible to certain problems:
- Aphids: These small insects can suck the sap from the leaves, causing them to curl and distort. Control aphids with insecticidal soap or by handpicking them off the plants.
- Spider Mites: These tiny pests can cause stippling on the leaves. Increase humidity and spray with miticide to control spider mites.
- Root Rot: This fungal disease can occur if the soil is too wet. Prevent root rot by ensuring that the soil is well-draining and avoid overwatering.
Enjoying Your Homegrown Thai Basil
Growing Thai basil from cuttings is a fulfilling and rewarding experience. With a little patience and care, you can enjoy a continuous supply of this fragrant herb for your culinary creations. From stir-fries to salads to refreshing beverages, Thai basil adds a unique and delicious flavor to a wide range of dishes. So, grab your pruning shears and start propagating – your taste buds will thank you!