Picture this: you’re making a delicious pesto, but you're out of fresh basil! A quick trip to the grocery store solves the problem, but what if you could extend the life of that store-bought basil and create an endless supply? The good news is, with a little know-how, you absolutely can! Growing Basil From Store-Bought: A Complete Guide So, can you really grow basil from store bought bunches? Absolutely! It's a fantastic way to save money, reduce waste, and enjoy fresh basil whenever you need it. However, the success of growing basil from store bought depends on a few key factors. This article will walk you through the entire process, from selecting the right basil to harvesting your homegrown leaves. We'll cover everything you need to know to successfully propagate basil from your grocery store haul. Selecting the Right Store-Bought Basil for Propagation Not all store-bought basil is created equal when it comes to propagation. To increase your ...
Basil, that fragrant herb that elevates everything from pesto to pizza, is a garden staple for many of us. But what if I told you there's an incredibly easy and cost-effective way to multiply your basil plants? You don't need fancy seeds or specialized equipment. All you need are healthy basil stems and a little bit of patience. Intrigued? Let's explore the simple magic of propagating basil from cuttings.
The Amazing World of Basil Propagation: Growing Basil From a Cutting
So,can you grow basil from a cutting? The answer is a resounding yes! In fact, propagating basil from cuttings is one of the easiest and most reliable ways to expand your basil collection. It's a simple process that yields impressive results. This method is not only faster than starting from seed but also ensures that the new plants are genetically identical to the parent plant, preserving desirable traits like flavor and disease resistance. Forget starting from seeds, this is your fast track to a basil bonanza!
Why Choose Basil Cuttings Over Seeds?
While starting basil from seed is a perfectly valid method, growing basil from cuttings offers several distinct advantages. Let's delve into the reasons why you might choose cuttings:
- Speed: Cuttings root much faster than seeds germinate and grow. You can have a transplantable plant in a week or two, compared to several weeks for seedlings.
- Cloning: Cuttings produce clones of the parent plant, meaning you'll get the exact same flavor and characteristics. This is particularly important if you have a favorite basil variety you want to preserve.
- Cost-Effective: Using cuttings eliminates the need to purchase seeds, saving you money, especially if you already have a healthy basil plant.
- Convenience: If you're already pruning your basil plant, taking cuttings is a quick and easy way to utilize the trimmings instead of discarding them.
- Guaranteed Success: With the right technique, rooting basil cuttings is highly successful, often boasting a much higher success rate than germinating seeds.
Think of it as a quick and easy way to copy and paste your favorite basil plant! Plus, you're actively contributing to a more sustainable gardening practice by reducing waste and reusing plant material.
Step-by-Step Guide: How to Take and Root Basil Cuttings
Now that you're convinced of the merits of basil propagation via cuttings, let's dive into the practical steps involved. Follow this guide, and you'll be well on your way to a thriving basil garden:
1. Selecting the Right Cutting Material
The success of your endeavor hinges on selecting healthy and vigorous stem cuttings. Look for these characteristics:
- Healthy Stems: Choose stems that are green, firm, and free from any signs of disease or pests. Avoid stems that are woody, yellowed, or have spots.
- Length: Ideal cutting length is between 4-6 inches. This provides enough stem for root development while remaining manageable.
- Leaf Nodes: Ensure your cutting has at least two or three leaf nodes (the points where leaves grow from the stem). These nodes are where the roots will emerge.
- Non-Flowering Stems: If possible, select stems that are not flowering or about to flower. Flowering takes energy away from root development. If your stem has flowers, pinch them off.
The best time to take cuttings is in the morning when the plant is fully hydrated. Use sharp, clean pruning shears or scissors to make a clean cut just below a leaf node. A clean cut minimizes the risk of infection and promotes faster rooting.
2. Preparing the Basil Cutting for Rooting
Once you've taken your cutting, some preparation is needed to maximize its rooting potential:
- Remove Lower Leaves: Carefully remove the leaves from the bottom 1-2 inches of the stem. Submerged leaves will rot and contaminate the water.
- Optional: Rooting Hormone: While not strictly necessary, dipping the cut end of the stem in rooting hormone can speed up the rooting process. Follow the instructions on the rooting hormone package.
3. Rooting in Water or Soil
You have two primary options for rooting your basil cuttings: water or directly in soil. Both methods are effective, but water rooting is often preferred for its visual appeal and ease of monitoring root development.
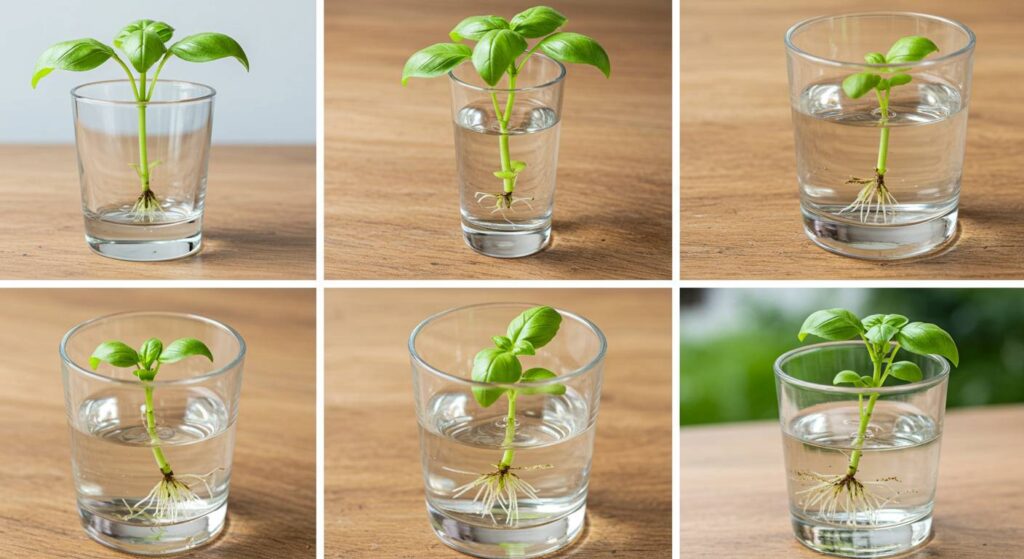
Rooting in Water:
- Choose a Container: Select a clean glass or jar. A clear container allows you to observe root growth.
- Add Water: Fill the container with clean, lukewarm water. Tap water is fine, but letting it sit out for a few hours to dissipate chlorine can be beneficial.
- Place Cutting: Place the cutting in the water, ensuring that the lower nodes are submerged but the leaves remain above the waterline.
- Location: Place the container in a bright, indirect light location. Avoid direct sunlight, which can scorch the leaves.
- Water Changes: Change the water every 1-2 days to prevent bacterial growth.
- Observe: Within a week or two, you should see small white roots emerging from the nodes.
Rooting in Soil:
- Prepare Potting Mix: Use a well-draining potting mix, such as a seed starting mix or a mix of peat moss and perlite.
- Moisten Soil: Moisten the potting mix thoroughly before planting.
- Plant Cutting: Make a small hole in the soil and gently insert the cutting, burying the lower nodes.
- Water Gently: Water the cutting gently to settle the soil around the stem.
- Humidity Dome (Optional): Cover the pot with a clear plastic bag or dome to create a humid environment. This helps prevent the cutting from drying out.
- Location: Place the pot in a bright, indirect light location.
- Watering: Keep the soil consistently moist but not waterlogged.
4. Transplanting Your Rooted Basil Cutting
Once the roots are about 1-2 inches long (for water-rooted cuttings) or the cutting shows signs of new growth (for soil-rooted cuttings), it's time to transplant it into a larger pot or directly into your garden.
- Prepare the New Location: Choose a sunny location with well-draining soil. Amend the soil with compost or other organic matter to improve fertility.
- Gently Remove the Cutting: If water-rooted, carefully remove the cutting from the water. If soil-rooted, gently dig around the cutting to lift it out of the pot.
- Plant the Cutting: Dig a hole slightly larger than the root ball. Place the cutting in the hole and backfill with soil.
- Water Thoroughly: Water the newly transplanted basil plant thoroughly.
- Monitor: Keep a close eye on your new basil plant for the first few days, providing extra water if needed.
Your cutting might experience transplant shock, which is the stress caused by being moved from one environment to another. During this time, give it some extra care and attention. With a little luck and proper care, you will soon have a new basil plant and will continue enjoying using rooted basil cutting.
Troubleshooting Common Problems When Rooting Basil Cuttings
While rooting basil cuttings is generally easy, you might encounter a few challenges along the way. Here's how to troubleshoot some common problems:
- Cutting Rotting: This is usually caused by bacteria or fungi. Ensure you're using clean water and changing it frequently. Also, avoid overcrowding the cuttings.
- Cutting Wilting: This indicates that the cutting is losing moisture faster than it can absorb it. Increase humidity by covering the cutting with a plastic bag or dome.
- Slow Rooting: Be patient! Some cuttings may take longer to root than others. Make sure the cutting is receiving adequate light and that the water or soil is not too cold. Rooting hormone can also help speed up the process.
- Yellowing Leaves: This can be a sign of nutrient deficiency. If rooting in water, you can add a diluted liquid fertilizer to the water after roots have started to form.
Remember that gardening is a learning process. Don't be discouraged if your first attempt isn't perfect. Keep practicing, and you'll quickly master the art of propagating basil from cuttings. These are the key points and problems you should look at while growing basil from cuttings.
Beyond the Basics: Tips for Supercharging Your Basil Cutting Success
Ready to take your basil propagation skills to the next level? Here are some advanced tips and tricks:
- Experiment with Different Basil Varieties: Try rooting cuttings from different basil varieties, such as Genovese, Thai, or lemon basil. Each variety has unique flavor profiles and characteristics.
- Use a Heated Propagating Mat: A heated mat provides bottom heat, which can significantly speed up the rooting process, especially in cooler climates.
- Air Layering: For larger, more mature basil plants, consider air layering as an alternative propagation method.
- Beneficial Microbes: Adding beneficial microbes to the water or soil can enhance root development and protect against disease.
With a little experimentation and attention to detail, you can create a flourishing basil empire from just a few cuttings! This method can be used for any of the basil family.
To keep your basil thriving, ensuring it gets enough water is crucial. Consider using a reliable watering system to make the task easier. A flexiblegarden hose that stretches 75 FT and comes with a 10-Function Nozzle is perfect for navigating around your garden beds, providing targeted watering without damaging your precious plants. Thiskink-free and lightweight option, available at https://amzn.to/3Yv E0Bo, makes gardening a breeze!
So, next time you're pruning your basil plant, don't throw away those cuttings! Instead, give them a new life and expand your herb garden for free. With a little bit of effort, you'll be enjoying an endless supply of fresh, fragrant basil all season long. Happy gardening!